Open a new transparent image 700 x 700 - you can resize later if you like Flood fill with white Open paper 6, copy, close, paste as new layer Load your mask with source luminance, fit to canvas, hide all mask checked Merge group Layers, duplicate With your pick tool, pull down from the top until you have something like this  Open element 14, resize to about 400 width, paste as new layer and move to the top right Open element 13, resize to about 300 width, paste as new layer and move up so it covers the mid section of the building Open frame 5, resize to 400 width, paste as new layer and move to the top left With your magic wand, click inside the frame Selections, modify, expand, 8 New raster layer Open paper 5, copy and close Paste into selection Move this layer below the frame layer IF YOU ARE NOT ANIMATING SELECT NONE AND SKIP DOWN TO CLICK ON THE FRAME LAYER New raster layer Duplicate twice so you have three blank layers Move the frame above these blank layers Activate the top blank layer Effects, plugins, Vanderlee, Snowflakes 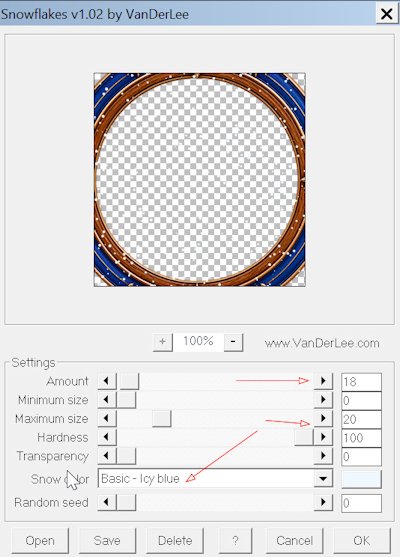 Click ok Adjust, blur, Motion Blur, angle at 135, strength 20, OK Activate the middle blank layer Effects, plugins, Vanderlee, Snowflakes and change the slider to a random setting Click ok Adjust, blur, Motion Blur, angle at 135, strength 20, OK Activate the bottom blank layer Effects, plugins, Vanderlee, Snowflakes and change the slider to a random setting Click ok Adjust, blur, Motion Blur, angle at 135, strength 20, OK Select none Click the frame layer to activate it Open element 4, resize to about 300 width, move up a bit so it overlaps the side of the frame and the flowers Open element 61, resize to about 200 width, move up and overlap the bottles Open element 56, resize to about 300 width, move to the bottom right Open element 37, resie to about 300 width, move almost covering the globe Open element 3, resize to about 250 width, move to the left side overlapping the frame Open element 23, resize to about 200 width, move just below the books - overlapping a bit Open element 11, resize to about 240 width, move to the right of the books Open element 41, resize to about 350 width, move left so it's overlapping the books and the open book Open element 5, resize to about 250 width, move to the bottom left Open element 60, resize to about 400 width, move to the center bottom Open the flare you downloaded Reduce it to really small and position over one of the dragon's eyes - then duplicate and cover the other eye Go through your layers and add drop shadows, except not on the animation layers For my text I used Santa's Big Secret in the background and dgoldfold pattern in the foreground Give it a drop shadow Add your credits and copyright FOR THOSE NOT ANIMATING, MERGE VISIBLE AND SAVE AS A PNG FILE For the animation Close the eye on the middle and bottom snow layers Click the top snow layer to activate it Edit, copy special, copy merged Go to AS and right click to paste as new layer Back to PSO, close the eye on the top snow layer Open the eye on the middle snow layer and click to activate it Edit, copy special, copy merged Go to as and paste after current frame Back to PSP, close the eye on the middle snow layer Open the eye on the bottom snow layer and click to activate it,br> Edit, copy special, copy merged Go to AS and paste after current frame Edit, select all Animation, frame properties, and change the speed to 15 Save as a gif file Thanks for trying my tutorial - enjoy your tag!!! |