
Font is Airnon, available free HERE Unzip and install Vanderlee Snowflakes plugin to your PSP plugins folder Unzip your masks from MB&SW and move into your masks folder in PSP Open a new transparent image 700 x 700 - you can resize later if you like. Fill with white Open paper 08, resize to 700 x 700, copy, close and paste as new layer Layers, Load Save Mask, Save mask from disk Choose MB&SW #65 with Source Luminance, Fit To Canvas and Hide All Mask checked Layers, merge, merge group Open element 37, paste as new layer and move to the left side Open element 75, paste as new layer and move up just a bit With your magic wand, click inside the wreath Selections, Modify, Expand about 10px Layers, new raster layer Open paper 10, copy and close Paste into selection Move this layer below the wreath layer Layers, new raster layer Duplicate this layer twice so you have 3 blank layers Click the top blank one to activate it Effects, Plugins, Vanderlee Snowflakes with these settings: 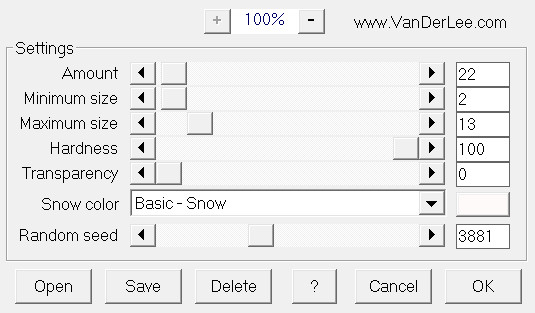 (If you want more snow than I used, increase the size and number of flakes) Click the middle blank layer to activate it Effects, Snowflakes and change to Random Seed - whatever number you like as long as it's different from the first blank layer Click the bottom blank layer to activate it Effects, Snowflakes and change to Random Seed - whatever number you like as long as it's different from the first two blank layers Selections, Select none Click on the wreath layer to activate it Open element 18, resize quite small and move to the top of the bow on the wreath Open element 23 resize and move to the bottom left Open element 9, resize and move to the bottom next to the dog Open element 12, resize and move to the bottom next to the bucket of snowballs Open element 65, resize and move to the bottom next to the snowman Open element 52, resize and move to the right side and up a bit Open element 79, resize and move to the right side, overlapping the bottom of the candle Open element 1, resize and move to the bottom right Open element 20, resize and move to the bottom right, beside the girl If you want to resize your tag, do that now before adding any drop shadows or script Add drop shadows to your layers (not to the snow layers) I used, 0, 4, 20, 13, black For the script I used Airnon, #085452 but any nice script would do I gave the script a drop shadow of 0, 2, 20, 3, black Now....to animate the tag: Close the eye on the middle and lower snow layers Click the top snow layer to activate it Edit, copy special, copy merged Go to Animation Shop and paste as new animation Back to PSP, close the eye on the top snow layer Open the eye on the middle snow layer Edit, copy special, copy merged Go to AS and past after current frame Back to PSP, close the eye on the middle snow layer Open the eye on the bottom snow layer Edit, copy special, copy merged Go to AS and past after current frame Save as a gif file Enjoy your new tag! And thanks for trying my tut! |